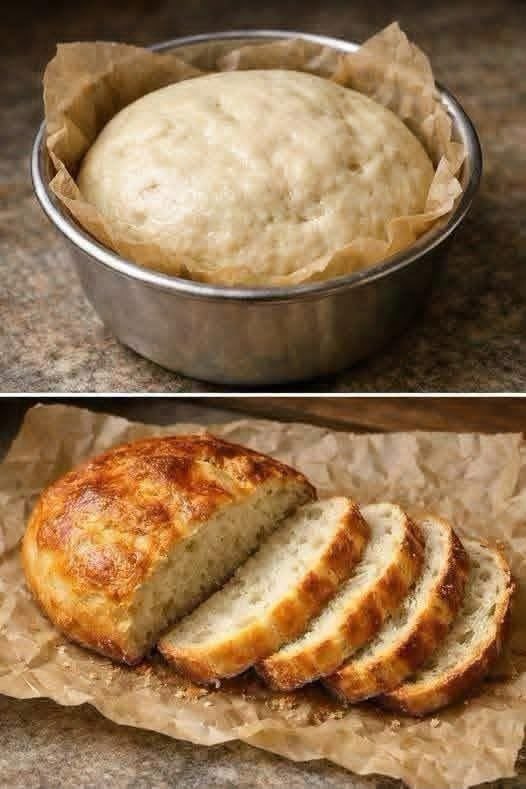
There are few culinary experiences as universally satisfying as slicing into a loaf of freshly baked, homemade artisan bread. The golden, crackly crust giving way to an pillowy, chewy interior is a sensation that store-bought loaves simply cannot replicate. However, for many home cooks, bread baking feels intimidating. Traditional bread recipes often demand extensive kneading, precise gluten development, complex pre-ferments, and strict timing that leaves little room for error.
This No-Knead Artisan Crusty Bread completely transforms the home baking experience. By leveraging high hydration and an extended fermentation time, nature does all the heavy lifting for you. Protein strands link together automatically over time, developing a strong gluten matrix without a single minute of physical kneading. Baked inside a hot Dutch oven or covered metal bowl, the trapped steam produces a blistered, bakery-style crust with an airy, open crumb structure.
Whether you are an absolute beginner taking your first steps into bread making or a seasoned home cook looking for a reliable, low-effort daily loaf, this four-ingredient recipe delivers professional artisan results straight from your home oven.
Why You Will Love This Artisan Bread
- Zero Kneading Required: No stand mixers, dough hooks, or tiring hand kneading necessary. A simple wooden spoon or spatula is all you need to combine the dough.
- Only 4 Pantry Staples: Made with basic, budget-friendly ingredients—flour, water, yeast, and salt.
- Bakery-Quality Crust & Crumb: High hydration creates a crisp, blistered golden exterior and a tender, airy interior filled with irregular air pockets.
- Flexible Schedule: The dough can rest on the counter anywhere from 8 to 18 hours, making it easy to mix the night before and bake fresh the next morning.
- Fail-Proof Method: Baking inside a covered vessel retains natural dough moisture, creating the steam environment essential for a high rise and crackly finish.
The Science Behind No-Knead Baking
To understand why this method yields exceptional bread with minimal effort, it helps to examine the underlying food science:
- High Hydration Ratio: Standard bread doughs typically hover around 60% hydration (water-to-flour ratio), requiring vigorous kneading to align gluten proteins. This recipe uses roughly 75% to 80% hydration. The extra water allows glutenin and gliadin proteins to move freely through the wet dough and link together naturally.
- Slow Fermentation: Over 12 to 18 hours, active yeast converts simple sugars into carbon dioxide gas and ethanol. As gas bubbles expand slowly throughout the sticky dough, they gently stretch the developing gluten network, essentially “kneading” the dough from the inside out.
- Enzymatic Flavor Development: Extended proofing times give naturally occurring enzymes opportunity to break complex starches down into simple sugars. This long development yields a rich, subtle complexity and mild tangy depth reminiscent of traditional sourdough.
- Trapped Steam Trajectory: Baking the proofed dough inside a preheated, covered container captures escaping moisture. This steam keeps the outer skin of the dough soft during the initial expansion phase (oven spring), enabling maximum rise before hardening into a thin, crunchy crust.
Recipe Metadata
- Prep Time: 10 minutes
- Rest/Proofing Time: 12 to 18 hours
- Cook Time: 45 minutes
- Total Time: 13 to 19 hours
- Yield: 1 round artisan loaf (approx. 8–10 slices)
- Dietary Profile: Vegan, Dairy-Free, Nut-Free, Plant-Based
Ingredients
Primary Dough Components
- 3 cups (360g) unbleached all-purpose flour or bread flour (plus extra for shaping)
- 2 tsp kosher salt or fine sea salt
- ½ tsp instant yeast or active dry yeast
- 1½ cups (360ml) warm water (around 100°F–105°F / 38°C–40°C)
Recommended Equipment
- Large mixing bowl (glass, ceramic, or stainless steel)
- Parchment paper (for easy transfer into the pot)
- Dutch oven (4 to 6 quart) with lid, OR a heat-safe deep metal bowl/pot with an oven-safe cover
Step-by-Step Baking Instructions
Step 1: Mix the Dry Ingredients
- In a large mixing bowl, whisk together the unbleached flour, kosher salt, and instant yeast until evenly distributed.
Step 2: Combine with Water
- Pour the warm water into the flour mixture.
- Using a wooden spoon, rubber spatula, or your hands, mix until all dry flour patches disappear and a shaggy, sticky dough forms. (The dough will look loose and messy—this is completely normal for a high-hydration loaf.)
Step 3: Long Overnight Fermentation
- Cover the mixing bowl tightly with plastic wrap or an airtight lid to trap moisture.
- Place the bowl in a warm, draft-free spot at room temperature (around 68°F–72°F / 20°C–22°C) for 12 to 18 hours.
- After resting, the dough will have doubled or tripled in volume, filled with small surface bubbles and a sticky, elastic texture.
Step 4: Shape the Dough
- Lay a sheet of parchment paper flat on your kitchen counter and dust it lightly with flour.
- Gently scrape the sticky dough out of the bowl onto the prepared parchment paper.
- Using floured hands, gently fold the edges of the dough in toward the center 3 to 4 times to form a rough round ball (boule).
- Turn the dough seam-side down on the parchment paper. Dust the top lightly with flour, cover loosely with a clean kitchen towel, and let it rest for 30 to 45 minutes for its final rise.
Step 5: Preheat the Oven & Baking Vessel
- While the dough completes its final rest, place your empty Dutch oven (or heat-safe metal bowl/pot) with its lid inside the cold oven.
- Preheat the oven to 450°F (230°C). Let the baking vessel heat inside the preheated oven for at least 30 minutes so it becomes scorching hot.
Step 6: Bake Covered for Steam
- Carefully remove the preheated Dutch oven from the main oven using heavy-duty oven mitts and place it on a heat-safe surface. Remove the lid.
- Lift the dough ball using the corners of the parchment paper as a sling, and carefully lower both the parchment paper and dough directly into the center of the hot pot.
- Cover immediately with the hot lid and return the pot to the oven.
- Bake covered at 450°F (230°C) for 30 minutes. The trapped steam inside the closed pot helps the dough achieve its maximum rise.
Step 7: Uncover for Golden Crust
- After 30 minutes, remove the lid from the pot.
- Bake uncovered for an additional 15 to 20 minutes until the crust turns a deep golden brown, crisp, and hollow-sounding when tapped on the bottom.
Step 8: Cool & Slice
- Using the parchment paper edges, carefully lift the baked bread out of the pot and transfer it to a wire cooling rack.
- Allow the loaf to cool completely for at least 30 to 45 minutes before slicing. Cutting into hot bread traps interior steam, causing the crumb to become gummy.
Pro Tips for Artisan Success
- Bread Flour vs. All-Purpose Flour: While standard all-purpose flour works wonderfully, using unbleached bread flour yields a slightly chewier structure and a higher rise due to its elevated protein content (12%–14%).
- Preheat the Pot Thoroughly: Never skip preheating your Dutch oven or heavy pot. A scorching hot pot provides an immediate blast of heat from below that triggers a powerful “oven spring,” lifting the dough high into a rounded boule.
- Use Parchment Paper: High-hydration doughs are very sticky and difficult to transfer into a 450°F pot by hand. Baking directly on parchment paper eliminates sticking and keeps your hands safe from burns.
- Resist Early Slicing: The interior structure of artisan bread finishes setting as it cools on the rack. Slicing too early squishes the delicate air pockets and creates a dense texture.
Common Mistakes & How to Avoid Them
- Using Water That Is Too Hot: Water above 120°F (49°C) kills yeast organisms, preventing your dough from rising during the overnight fermentation. Keep water comfortably warm to the touch.
- Adding Extra Flour to Sticky Dough: It is tempting to add extra flour when seeing how wet and sticky the dough looks. Adding extra flour lowers the hydration ratio, resulting in a dense, heavy brick instead of an airy artisan loaf. Trust the wet process!
- Forgetting the Lid: If you bake the loaf uncovered the entire time, the outer crust hardens prematurely before the dough has a chance to expand fully, restricting its volume.
Flavor Adaptations & Custom Add-Ins
Once you master the classic base loaf, elevate your artisan bread with these delicious flavor variations folded into the dry flour before adding water:
- Garlic Herb & Parmesan: Add 2 teaspoons of dried Italian herbs, 1 teaspoon of garlic powder, and ½ cup of freshly grated parmesan cheese.
- Cheddar Jalapeño: Fold ½ cup of sharp diced cheddar cheese and 2 tablespoons of finely chopped pickled jalapeños into the dough.
- Cranberry Walnut: Incorporate ⅓ cup of dried cranberries and ⅓ cup of chopped walnuts for a sweet and savory breakfast loaf.
- Rosemary Sea Salt: Fold 1 tablespoon of finely chopped fresh rosemary into the dough, and top the loaf with coarse flaky sea salt right before placing it in the oven.
Storage & Freezing Instructions
- Room Temperature Storage: Store the uncut loaf cut-side down on a wooden cutting board or inside a paper bag at room temperature for up to 3 days. Avoid plastic bags, as they trap humidity and soften the crispy crust.
- Freezing Baked Bread: Slice the cooled loaf completely. Place parchment paper strips between slices, wrap tightly in foil, and store in a freezer bag for up to 3 months. Toast individual slices straight from the freezer whenever needed!
- Refreshing Stale Bread: To restore a crispy crust on a day-old loaf, run the uncut loaf quickly under cold water for 2 seconds, then pop it into a 400°F (200°C) oven for 8 to 10 minutes. It will emerge piping hot with a freshly baked crust!
SEO-Optimized Frequently Asked Questions
Can I make this no-knead bread without a Dutch oven?
Yes! If you do not own a Dutch oven, you can use any deep, oven-safe metal pot or metal bowl with a lid. Alternatively, place a heavy-duty baking sheet in the oven and add a cast-iron skillet filled with 1 cup of boiling water onto the bottom rack right as you put the bread in to create a manual steam environment.
Why is my no-knead bread dough so wet and sticky?
A wet, sticky consistency is a core signature of high-hydration no-knead doughs. This high moisture content creates the trapped steam needed to yield a crispy, crackly crust and an open, airy crumb without physical kneading.
Can I let the dough rise longer than 18 hours?
For optimal flavor and rise, keep the room-temperature fermentation window between 12 and 18 hours. If your schedule requires a longer rest, place the covered bowl in the refrigerator after 8 hours. The cold temperature slows yeast activity, allowing the dough to rest safely for up to 3 days before shaping and baking.
Estimated Nutritional Snapshot (Per Serving – Based on 10 Slices)
- Calories: ~165 kcal
- Protein: 5g
- Carbohydrates: 34g
- Dietary Fiber: 1.5g
- Sugars: 0.5g
- Fat: 0.5g
- Sodium: 440mg